1. Getting Started
Welcome to the MyInfo manual.
1.1. What is MyInfo?
MyInfo is a personal information manager (PIM). It helps you collect, store, and organize information, including notes, links, and files.
MyInfo uses easy to understand metaphors for organizing your information. Everything is stored in notes, which are placed in sections and notebooks. Each notebook can have one or more sections.
If notes are related to each other, they can be organized in an outline. If not, they can be organized in an automatically sorted list. You can also link to other notes from within the text of the note like in a wiki.
MyInfo offers different ways to view your notes such as trees (hierarchies) and customizable lists (perspectives).
You can search for notes in any of the open (or even closed) notebooks. Notes can also be printed and exported to other applications.
1.2. User Interface
MyInfo features a standard Windows user interface. It includes menus, toolbars, and a number of panes.
The main components are the note list and the note editor.
The note list is where you see a list of all available notes for the currently selected notebook section and perspective. It can show additional columns, each of which displays some of the available attributes.
The note editor is where you see and edit notes. It consists of the note title, tags, optional form with additional attribute editors and note editor, where you can work with the note text content. If your note is a bookmark or document (has default attachment), there is also an internal viewer available. If the note contains attachments, they are listed in the note attachments list.
| You can edit most note attributes directly in the note list or in the optional Attributes pane to the right of the note editor. |
Use the notebook list (left) and the section tabs (top) to switch the active notebook and section.
To change the active perspective, click on any other in the perspective list left of the note list.
There are two panes, which are not visible by default, but can be helpful in some situations: the tags list shows all available tags in the section, and the status bar shows additional information about the notes.
1.3. Information Model
MyInfo stores everything in notebooks. Each notebook is a separate file on your computer. Notebooks contain one or more sections, where you place your notes.
The note is the basic unit of information in MyInfo. It has attributes, tags, text content, and attachments.
Attributes are facts about your notes like title, creation date, priority or reminder date. There are a number of predefined attributes, but you can also create your own. Your attributes can use different types such as text, number, date, and checkboxes.
If you prefer more freedom about describing your notes, you can use tags in addition to, or instead of, attributes.
The note text content is where you can enter formatted text, tables, pictures, links (to web sites, files, or to other notes), or any other free-form information.
Sometimes the information you want to store is not suitable for inserting in the note editor. In these situations you can attach files to your notes (like PDFs and Excel files). If your notes are related to each other hierarchically (for example like in a family tree), you can arrange them in a tree, where notes can have parent notes.
If your notes are related to each other hierarchically (for example like in a family tree), you can arrange them in an tree, where notes can have parent notes.
If not, you can use various perspectives to see a list of your notes, filtered, sorted and grouped by their attributes and tags.
1.4. Updates
Automatic Updates
MyInfo offers an automatic updates feature. Enabling this feature (enabled by default) will allow your software to automatically check for updates and install them as they become available. This will keep your copy of MyInfo with the latest features, improvements, and bug fixes available.
To turn on/off Automatic Updates:
-
Click on the command. The Options dialog will appear.
-
Click on the Updates & Privacy item in the options sections list.
-
Check or uncheck the Automatically check for new versions of MyInfo checkbox to turn on or turn off this feature and then click OK.
| Having Automatic Updates turned on does not mean that they will be installed automatically. You have full control whether you want to install or skip updates when they are available using the Install Update and Skip Update buttons. |
Register for Updates [Since 8.1]
If you use registered version of MyInfo, MyInfo will need your Update Key in order to continue receiving automatic app updates.
To enter your Update Key:
-
Click on the command. The Register dialog will appear.
-
Paste the Update Key that you received on your email in the text box.
-
Click OK to accept the Update Key and close the dialog.
| If you can’t find the email with your Update Key, please contact support. |
2. Notebooks & Sections
All information in MyInfo is stored in files called notebooks. Each notebook contains one or more sections.
Use multiple notebooks if you need to separate your information between major areas like work and personal life. Using as few notebooks as possible is advisable, because they allow you to share attributes, clones, forms, (auto-updatable) links, note templates, text styles and other powerful features between all notes in the notebook.
Use multiple sections to divide notes in the notebook by project, area or any other criteria. Each section has its own set of perspectives allowing for easy overview of your notes.
2.1. Working with Notebooks
Create a Notebook
To create a new notebook:
-
Click on the command. The New Notebook dialog will appear.
-
In the Name text box, type the name of the new notebook.
-
If you want to use a specific notebook template for the new notebook, select it in the From Template list.
-
Click OK to create the new notebook. If you prefer to create the notebook in a location different than the default notebooks folder, click Save As instead.
Open a Notebook
To open an existing notebook(s):
-
Click on the command. The Open dialog will appear.
-
Find and select the topic you want to open and then click OK.
| If you want to open more than one notebook at the same time, you can select multiple notebooks in the Open dialog. |
Close a Notebook
To close one or more open notebooks:
Use the command to close the currently active notebook.
Use the command to close all open notebooks.
Rename a Notebook
To rename an open notebook:
-
Click on the command. The Notebook Properties dialog will appear.
-
Type the new notebook name in the top text edit box in the dialog.
-
Click OK.
| You can also rename the notebook by right clicking on the notebook title in front of the sections tabs and use the Rename command. |
Switching Between Open Notebooks
If you have more than one notebooks open, you can switch between them:
-
if the Notebooks pane is open, just click on the notebook which you want to activate
-
if the Notebooks pane is closed, then use the Notebooks drop down list in front of section tabs. Click on it to see a list of all open notebooks and click on the notebook that you want to activate.
2.2. Working with Sections
Create a Section
To create a new section:
-
Right click on the section tabs above the note list and the note editor and click on the New Section command or click on the + button in the end of the section tabs.
Rename a Section
To rename a section:
-
Right click on the section tab or on the section in the Notebooks pane and click on the Rename command.
-
Type the new section name in the text edit box in the dialog.
-
Click OK.
Delete a Section
To delete a section:
-
Right click on the section tab or on the section in the Notebooks pane and click on the Delete command. A confirmation dialog will appear.
-
Click Move to Trash to confirm that you want to move the section to the Trash.
Switching Between Open Sections
If your notebook has more than a single section, you can switch between them:
-
click on a section tab in the section tabs above the note list and the note editor
-
or, if the Notebooks pane is open, click on the section which you want to activate
Move a Section
You can reorder sections inside the notebook by dragging them with the mouse in the section tabs or in the notebooks pane.
To move a section using the Move dialog:
-
Right click on the section tab or on the section in the Notebooks pane and click on the Move command. The Move Section dialog will appear.
-
Select the section after which you want to move the active one.
-
Click Move.
Copy a Section
You can copy a section to another notebook by dragging it with the mouse to another notebook in the notebooks pane.
Change Section Color
You can change the active section color, which is used when displaying the section in various parts of the user interface like the section tabs, notebooks pane and Move dialog.
To change the section color:
-
Right click on the section tab or on the section in the Notebooks pane and in the Section Color sub-menu select a new color for the section.
2.3. Attributes
Notes have attribute values, which contain additional information about them such as title and modification date. Certain attributes are read-only (creation, modification date), but the majority of them are editable, so you can change their values.
Default Attributes
When you create a notebook, it will have a number of pre-defined attributes. Here is a list of them (grouped by category) and their purpose:
Common
| Comment |
Used to add a small comment text for the note. Comments are visible in the note list, if you show either the Has Comment or Comment columns. |
| Created |
Shows the date and time when the note was first created (read-only). |
| Form |
Specifies the note entry form (optional). |
| Icon |
Shows note icon index (read-only). |
| Is Clone |
Indicates whether the note has clones (read-only). |
| Level |
Shows the depth level of the note in the tree hierarchy (read-only). |
| Parent Title |
The name of the note parent, if it has one (read-only). |
| Sensitivity |
Specifies note sensitivity (normal, personal, private, or confidential). By default notes have normal sensitivity. |
| Size |
Shows note size in bytes. |
| Tags |
Shows note tags. Use tags to group related notes or to find them faster later. Tags are visible in the note list, if you show either the Has Tags or Tags columns. |
| Template |
Specifies note template. |
| Title |
Note title. Give the note a meaningful title, so you can easily spot it in the note list or find it via quick filter. |
| Updated |
Shows the date and time when the note was last modified (read-only). |
Document (specific to Bookmark and External Document notes)
| URL |
Specifies the web address or file name for a bookmark or external document note. |
Task (specific to Task notes)
| % Completed |
Shows the progress of a task. |
| Completed At |
Shows when a task was finished. |
| Due Date |
Shows when a task is due. |
| Is Task |
You can use this attribute to filter for task-like notes in perspectives. |
| Priority |
Sets the task priority (low, normal or high). By default all tasks have normal priority. |
| Reminder At |
Sets a reminder for the task. When the time of the reminder is due, MyInfo will open a pop-up screen with information about the task. |
| Started At |
Specifies when a task was started. |
Creating User Attributes
You can create your own attributes to use in different scenarios. They can be of any of the following attribute types:
|
|
Store single line of text. |
|
|
Store number with specific format. |
|
|
Clickable on/off checkbox. |
|
|
Store an amount of money. |
|
|
Store date or date/time with specific format. |
|
|
Store an amount of time in minutes, hours, days, etc.. |
|
|
Store an email address. |
|
|
Allows you to assign one or more predefined text items. |
|
|
Store a phone number. |
|
|
Set a rating by clicking on a predefined number of stars. |
|
|
Allows you to assign single predefined text item. |
|
|
Store a website address. |
MyInfo uses note attributes in different places of its user interface: those, which are applicable to all notes in the current section, can be shown as columns in the note list; all applicable attributes are also displayed in the Attribute pane. You can edit them directly in both places.
2.4. Backup & Restore
MyInfo automatically creates backup copies of your notebooks in a specified interval. By default it creates 2 backup copies and the interval between the copies is 24 hours, but you can change these settings via .
| If a notebook is not stored in the default notebook location, then its backups will be stored in the folder, where is stored the notebook itself. This has to be done in order to avoid conflicts between backups of notebooks that have the same file names, but are stored in different locations. |
To restore a backup, use the command and then click on the Revert To This Backup button.
2.5. Encryption
You can encrypt your notebooks by password-protecting them using . MyInfo uses a state-of-the-art 256-bit AES encryption.
Once open, protected notebooks work exactly like normal notebooks. The only limitation is that closed protected notebooks can’t be searched by_ Global Search_.
| There is absolutely no way to open a notebook if you forget its password. So, please make sure that you never lose the password for your notebook. |
2.6. Forms
Forms make entering and browsing note attribute values easier. They allow you to customize note layout, showing you the relevant attributes for the note.
Forms consist of a number of attributes in any order you specify.
You can create as many forms as you want and specify a different form for each note (use the Form attribute in the Attributes pane). However, in most cases, you will want to set the form in a note template. That way, each note based on this template will use the specified form.
To create new forms or edit existing ones, use .
| You can use all attributes in a form, except Title and Tags (which are always visible), the Form attribute itself and attributes from the Template attribute group. |
2.7. Notebook Revisions
MyInfo automatically creates a revision for each change you make in a notebook. That allows you to undo any recent change made in the notebook. By default it stores the last 20 revisions, but you can change their number or entirely disable this feature (not recommended though) via .
You can use the following commands to move through revisions:
|
|
Undoes last change made in the notebook. |
|
|
Redoes last undone change in the notebook. |
|
|
Shows Notebook Revisions pane. |
Undo Revision and Redo Revision commands are only available when the note list is active. If a text editor is active, then Undo and Redo work locally in the text editor rather than globally in the notebook.
| Making changes to the notebook while it is at an older revision, removes all reverted revisions! |
Notebooks Revisions pane shows all available revisions for the active notebook. The pane allows you to revert or redo more than one revision at a time. It also shows additional information about each revision like who made it, when and which item and how it was affected.
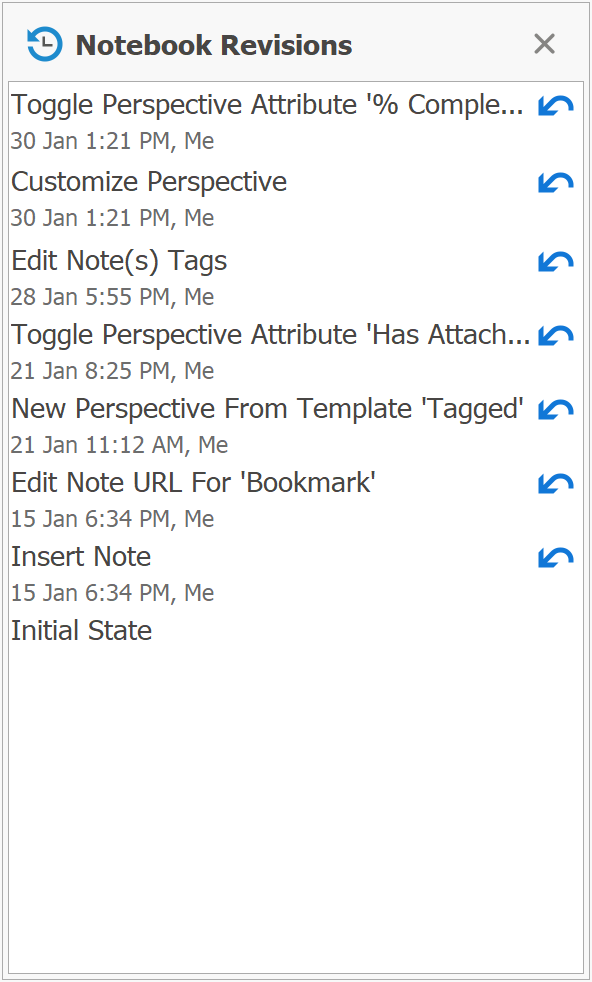
Clicking on a revision Undo button will revert all changes up to and including this revision.
2.8. Notebook Templates
If you do not want to start from scratch with a new notebook, you can use a predefined notebook template.
-
Click to open the dialog with the same name.
-
Type a name for the new notebook.
-
Select a template from the From Template list.
-
Click OK.
Adding New Templates
Technically, notebook templates are regular notebook files. What makes them special and behave like templates is the fact that they are stored in a folder with a special meaning for MyInfo. So you can easily add or remove templates by copying or deleting notebook files to and from this folder.
The location of the Templates folder on your computer depends on the type of MyInfo installation you use. It differs for the desktop and for the portable editions. You can see or modify the location of your templates by clicking and there examine the content of the Templates line in the File locations list.
2.9. Trash
Each notebook has a Deleted Notes section which stores all notes you delete from the notebook. You can easily restore accidentally deleted notes by going there () and moving one or more notes (including their sub-notes) back to the desired section. To do so, select the notes in the note list and click .
Items placed in the Trash are automatically removed after 30 days.
3. Working with Notes
3.1. Navigating Notes
Via Keyboard
When you are in the note list, you can move between notes using the standard keys: Up does to the previous visible note, Down goes to the next visible note. Left goes to the note parent and Right goes to the note first subnote (if there is any).
Via Go To Note Dialog
Press Ctrl+G to open the Go To Note dialog. Then start typing the title of the note you want to go to, and you will see a filtered list of all notes that contain this text in their titles. Use the keyboard arrows to move to the note you want and press Enter to go this note.
Via Search
Click on the Search edit (or press Shift+Ctrl+F) and type the text you want to search for and press Enter.
If there are any results, they will be displayed in the Search pane, where you can click on the results and go to the specified notes.
| MyInfo will search for the text you entered in notes' titles, text content, and in all supported attachments content (text files, PDFs). |
3.2. Adding Notes
You can add new notes to MyInfo in a variety of ways. You can create blank notes and then type text in them, import notes from other applications, drag & drop files, or even capture web snippets from your web browser.
Create Blank Note
To create a blank note:
-
In the note list, select the note after which you want to create the new note.
-
Click on the command or press Ctrl+N.
| You can create new blank notes quickly by pressing Enter while the note list is active. |
Create Blank Child Note
To create a blank child note:
-
In the note list, select the parent note for the new note that you will create.
-
Click on the command or press Shift+Alt+N.
| You can create new blank child notes quickly by pressing Ctrl+Enter while the note list is active. |
Create Note From Template
To create a note based on a note template:
-
In the note list, select the note after which you want to create the new note or the parent note, if you want to create a child note.
-
Select the command and click on a template in the list that will appear.
| You can learn about the different default note templates in the note templates section. |
Create Note From Existing File
You can import an existing file from your computer as a note. If possible, MyInfo will extract the text from the file and will insert it in the note editor for the new note. If that is not possible, the file will be attached to the new note.
To create a note from an existing file:
-
In the note list, select the note after which you want to add the new note.
-
Click on the command. The Insert Notes From Files dialog will appear.
-
Select one or more files that you want to insert.
-
Click Open to insert the file(s).
Create Note From Windows Clipboard
You can paste any content in the note list and MyInfo will try to create a note from it.
To create a note from Windows Clipboard content:
-
Copy something from another application (text from MS Word, web snippet from your browser, etc).
-
In the note list, select the note after which you want to add the new note.
-
Click on the command or press Ctrl+V.
Drag Files From Other Applications
You can add new notes by dragging them from Windows Explorer to the note list.
If possible, MyInfo will extract the text from the dragged file and will insert it in the note editor for the new note. If that is not possible, the file will be attached to the new note.
Capture Web Snippet As Note
If you have the Send to MyInfo extension installed in your web browser, you can capture web page fragments or whole web pages without opening MyInfo.
To create a note using the Send to MyInfo extension:
-
Make sure that the note list is active. If the note editor is active instead, the extension will just paste in the editor, instead of creating new notes.
-
In the web browser, select the content that you want to capture.
-
Right click on the selection and in the context menu, select the Send to MyInfo command, then one of the following:
-
Send as Text: this will create a new note in MyInfo and insert the selection as note content
-
Send as Web Document: this will create a new Bookmark note with the address of the current web page
-
Send as Attachment: this will create a new External Document note with a cached copy of the selection or the whole web page (if nothing is selected)
-
3.3. Moving Notes
There are a few ways to move existing notes from one place in the tree to another, or from one section to another.
Move Commands
You can move selected notes in the tree using the Move commands.
To move a note:
| To select | Do this |
|---|---|
Before the previous (sibling) note |
Click on the |
After the next (sibling) note |
Click on the |
One level up in the tree, making them sibling note to their parent note |
Click on the |
One level down in the tree, making them subnotes of the previous note in the tree |
Click on the |
Move With the Mouse
You can move notes in the tree using the mouse drag & drop functionality.
To move notes in the tree:
-
Select the notes you want to move.
-
Start dragging the selected notes.
-
A red line will appear in the tree, showing you where dragged items will be moved:
-
to move them after a note, hover with the mouse over the target note title.
-
to make them children/subnotes of a note, hover with the mouse over the target statey (icon), so that the dragging mouse cursor shows a white arrow icon.
-
-
Drop the notes to their new location.
| To cancel dragging, press the Esc key. |
Move Notes Using the Clipboard
To move notes using the Windows Clipboard:
-
Select the notes you want to move.
-
Select the
 command or use the Ctrl+X shortcut.
 -
If the location, where you want to move the notes is in other section, switch to this section.
-
Select the note, after which you want to move the notes.
-
Select the
 command or use the Ctrl+V shortcut.
3.4. Attachments
Sometimes you want to store external files in MyInfo. You can attach any number of files (within certain limits) to a specific note. These attachments will be stored inside the notebook, so moving the notebook to another computer will move them too.
The list of available attachments for the note is shown in the note attachments list below the note editor (if the note has attachments).
3.5. Clones
You can clone notes, so that the same note can be in multiple places in the tree. Cloned notes are exact copies of the original note and each time the original note or the cloned notes are modified, these changes are synchronized for all notes from the same clone group.
-
Select the note in the note list that you want to clone.
-
Copy the note by clicking (or press Ctrl+C).
-
Select the note after which you want to place the new cloned note and click (or press Shift+Alt+V).
Cloned notes have a small clone indicator in the bottom left corner of their icon: ![]()
3.6. Hoist
Hoist command allows you to focus on a specific part of the note list tree. When you use the Hoist command, all notes that are not children or direct parents of the currently selected note will disappear from the tree.
While in hoist mode, you can use most commands as in a normal tree view.
-
Select the note that you want to focus to.
-
Select the command.
To show all notes again, use the command.
| Hoist works only in tree perspectives. |
3.7. Linking Notes
You can insert links to other notes in the note editor like in a wiki.
You can do that in several ways:
-
by clicking on the any of the following commands:
-
: this will create a link to the cursor position in the note editor of the active note
-
: this will create a link to beginning of the active note
-
: this will create a link to the active notebook
-
-
by using the Link dialog: click (or press Ctrl+K) and then in the Link dialog, click the Note in Section, and browse for the note you want to link to
-
by entering @ in the note editor and then start typing the title of the other note’s title. This will show a list with matching notes - just press Enter to insert the first one in the note editor (or use the arrows to select another)
| You can use copied links in other applications that support hyperlinks too (MS Word, MS Excel). Clicking on them will open MyInfo and go to the specified item. |
3.8. Note Templates
Each note in your notebooks is based on a note template. Note templates are predefined notes, stored in the notebook, which specify some initial note attribute values like title, form, and note icon. They also define which attributes are available by default in the Attributes pane (in addition to the attributes from the Common category, which are always available).
You can edit, create or delete note templates in the Templates section of the notebook ().
Create Note From Template
-
In the note list, select the note after which you want to create the new note.
-
Either right click on the selected note and use the Note submenu to select the template or click on the command and select the template from the submenu there.
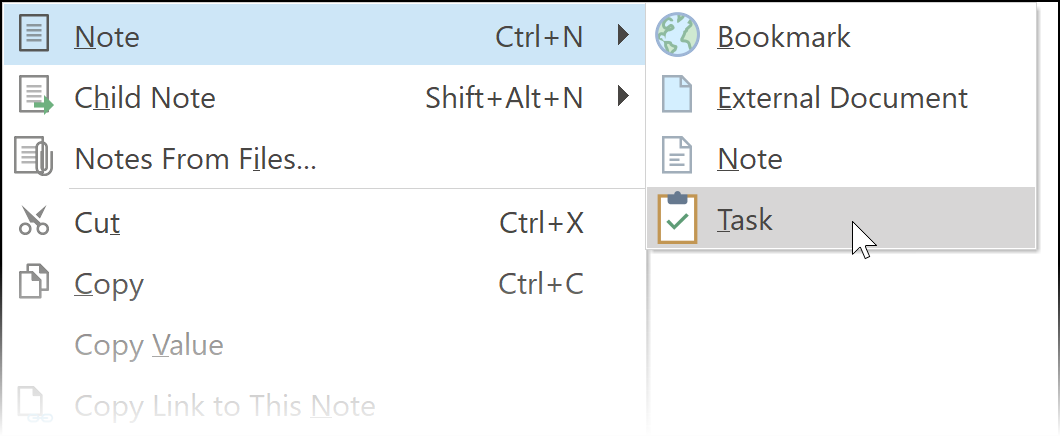
Default Templates
 Note
Note-
Regular text note. This is the default template for new notes.
 Bookmark
-
Note with an URL attribute. Use it to preview a web page via the internal browser. You can also save a cached copy of the page inside MyInfo, so even if it disappears from the Internet, you will still have a working copy.
 External Document
-
Note with a default attachment or link to an external file. Use it to preview a linked file on your computer or to store an entire file inside MyInfo.
 Task
Task-
Note with a checkbox that includes task-specific information like when a task was started, due, or finished.
Template Structure
Each note template consists of:
-
Template Name - this template-specific attribute value is used as a name for the template in the user interface of the application. This is what you see when you decided to create a new note and browse the templates list
-
Title, attribute values, text content, attachments - this is the initial data of the notes that you create when you use the template. This is static data - once you create your note, changing the template has no effect on notes that are created with this template
-
Form - if you want your notes to use specific entry form, select it in the Forms attribute of the template
-
Visible attributes - if you want notes based on this template to have some attributes visible in the Attributes pane when they are selected, you need to add an empty attribute value to the template by right clicking in the Attributes pane and using the Add Value command. This is the only dynamic part of the template. Adding and removing empty values to the template affects which attributes are visible for the notes based on it
| You can create a Task-like template, which has checkbox icon, that can be toggled by clicking on it, by adding Start Date, Due Date or Completed Date attribute value to a new template. |
3.9. Perspectives
Generally you work with your notes by ordering them manually in a tree. But in many cases you need to see them ordered and/or grouped automatically by some attribute.
Perspectives allow you to see your notes from different points of view: as an outline, alphabetical list, to-do list, etc. Each perspective includes settings like visualization mode (hierarchy vs list), filter rules, sort and group order.
By default, new sections contain a single, Tree perspective. You can create additional perspectives by clicking on the New button on the bottom of the Perspectives pane.
There are two types of perspectives in MyInfo:
|
|
Shows notes in a tree of notes and (optionally) subnotes. Notes in this perspective are ordered manually. |
|
|
Shows notes in a list. They are automatically sorted by some attribute and optionally grouped by value. |
When creating a new perspective, MyInfo already includes a couple perspective templates for some frequently used cases:
| Attachments |
Shows notes containing attachments, grouped by attachment size. |
| Completed |
Shows completed notes that use a task-like note template. |
| Overdue |
Shows tasks with due date, when their Due Date is in the past. |
| Recent |
Shows recently modified notes ordered by Updated date attribute. |
| Reminders |
Shows notes that have Reminder At attribute value. |
| Tagged |
Shows notes that contain tags, grouped by tag names. |
| Tasks |
Shows all task-like notes. |
3.10. Reminders
You can set reminders for notes, so that MyInfo will show a pop-up dialog with information about the note, when the reminder is due.
By default, task notes already have an empty Reminder At attribute value, which you can edit to set a reminder for the note.
You can also add a reminder for any other note by clicking and then selecting a date and time for the Reminder At attribute value in the Attributes pane.
To see a list of all reminders that are already due, click .
3.11. Tags
Tags are an easy, but powerful tool for organizing your notes. They allow you to group related notes, no matter where they are located in the tree, so you can later find or see a list of notes using certain tag(s).
To add note tags, just click on the Click to add tags caption in the tag editor above the note editor. Type new tags by separating them either by pressing , or the Enter key.
To remove a tag from the note, move the mouse over the tag and click the X icon next to it.
You can quickly see all notes with a certain tag by clicking on the tag in the note editor. You can also search for tags or use them for filtering in your perspectives.
Nested Tags
[Since 8.0] Tags can have a hierarchy. Let’s say you have a vehicle tag which contains articles about different vehicles, but you want to quickly find all the airplanes in it. In this case all you have to do is to assign this tag for all your airplane notes:
vehicle/airplane
The / symbol tells MyInfo to manage the tag as a hierarchy where vehicle is the parent tag and airplane is its child.
You can nest tags as deep as you want. For example vehicle/car/ford/model-t/1953 is a perfectly fine tag.
You can rearrange your tags in the Tags Pane via drag & drop or using the Move Tag command.
Tags Pane
The Tags pane shows you a list of all tags available in the notebook. It is the place, where you can organize your tags by adding new, or rename and delete existing tags. You can also drag tags from the tags pane to the note tag editor to quickly add them to the note.
You can show the Tags pane by clicking .
Right click on a tag in the pane or in the empty area to invoke the context menu, which contains the following commands:
| Shows Notes For Select Tag(s) |
Clicking on it will show you all notes in the current section, that contain the tags selected in the tags pane. You can add more tags to the filter by dragging them to the tags filter, which will appear after using the command. |
| Copy Tag(s) |
Copy selected tags to the Clipboard. |
| Rename Tag |
Choose a new name for a tag. This will automatically rename the tag for all notes that already have it. If you type the name of an already existing tag, both tags will be merged and all notes that contain the old one, will contain the new one instead. |
| Move Tag [Since 8.0] |
Move tag to make it a child of another tag or to make it a root tag. |
| Delete Tag(s) |
Remove a tag from all notes that have it and delete the tag from the notebook. |
| Order Alphabetically/By Count |
Change how tags in the pane are ordered. |
| Show Tags Count |
Check this option in order to see the number of notes that have each tag in the notebook. |
4. Working with Text
Text content is often a major part of your notes. MyInfo has many features for working with rich formatted text.
4.1. Editing Text
MyInfo’s note editor is very similar to the Microsoft’s Word text editor. The way you select, edit, and format text in MyInfo is almost identical.
Selecting Text
You can select text and items in the note editor using either the mouse or the keyboard.
To select text with the mouse:
| To select | Do this |
|---|---|
Any amount of text |
Drag over the text. |
A word |
Double-click the word. |
A paragraph |
Triple-click on the paragraph. |
A picture |
Click on the graphic. |
A large block of text |
Click at the start of the selection, scroll to the end of the selection, and then hold down Shift and click. |
To select text with the keyboard:
| To extend a selection | Press |
|---|---|
One character to the right |
Shift+Right Arrow |
One character to the left |
Shift+Left Arrow |
To the end of a word |
Ctrl+Shift+Right Arrow |
To the beginning of a word |
Ctrl+Shift+Left Arrow |
One line down |
Ctrl+Down Arrow |
One line up |
Ctrl+Up Arrow |
One screen down |
Shift+Page Down |
One screen up |
Shift+Page Up |
The whole document |
Ctrl+A |
A large block of text |
Click at the start of the selection, scroll to the end of the selection, and then hold down Shift and click where you want to end the selection. |
Deleting Text
To delete text or an item in the note editor:
| To Delete | Do |
|---|---|
Current editor selection |
Press the Delete key or click on the command. |
One character to the left |
Press the Backspace key. |
One character to the right |
Press the Delete key. |
One word to the left |
Press Ctrl+Backspace. |
One word to the right |
Press Ctrl+Delete. |
Undo/Redo Editor Changes
When the note editor is active, you can undo and redo recent text changes.
-
Click on the
 command or use the Ctrl+Z shortcut.
-
Click on the
 command or use the Ctrl+Y shortcut.
| You can undo/redo multiple actions by using the command repeatedly. |
4.2. Inserting Items
Insert an Existing Text File
To insert an existing text file in the note editor:
-
Click on the location where you want to insert the file.
-
Click the command. The Insert File dialog will appear.
-
Find and select the file you want to insert.
-
Click Open.
Insert a Picture
To insert a picture from a file in the note editor:
-
Click on the location where you want to insert the picture.
-
Click the command. The Insert Picture dialog will appear.
-
Find and select the picture you want to insert.
-
Click Open.
Insert a Link
MyInfo note editor automatically recognizes web and email addresses as you type. However, sometimes you want more control over the inserted link (for example to choose a caption).
-
Click on the location where you want to insert the link.
-
Click the command. The Insert Link dialog will appear.
-
The following options are available:
To insert a link to Do A web address
Type the address in the Type address box or select it from the Recently used links list.
A folder on your computer or on your local network
Click the Folder button and in the Browse For Folder dialog that will appear, select the folder you want to link to, and click OK.
A file on your computer or on your local network
Click on the File button and in the Browse For File dialog that will appear, select the file you want to link to, and click Open.
Other note in the notebook
Click on the Note in Section button in the left sidebar and in the note list that will appear, select the note you want to link to. If the note is in another section, click the dropdown arrow in the Select section box and choose the section that contains the note.
E-mail address
Click on the E-mail Address button in the left sidebar. Type the e-mail address in the E-mail address box and type the message subject (if any) in the Subject box. You can also recall an e-mail address in the Recently used e-mail addresses list.
-
If you want the link caption to be different than its address, type the desired caption in the Text to display box.
-
Click OK.
| Learn more about links to notes and how you can insert them faster. |
Insert a Table
To insert a table in the note editor:
-
Click on the location where you want to insert the table.
-
Click on the command. The Insert Table dialog will appear.
-
Specify how many table columns and rows you want in the Number of columns and Number of Rows boxes.
-
If you want the table to automatically fit within the note editor width, select the Auto fit to window option.
-
If you want the table to have a fixed width in points, select the Fixed column width option and type the desired column in the Fixed column width option and type the desired column in the Fixed column width box.
-
Click OK.
Insert Date and Time
To insert date and time, in a specified format, in the text editor:
-
Click on the location where you want to insert date and time.
-
Click the command. The Date And Time dialog will appear.
-
In the Available formats list, select the desired date and time format.
-
Click OK.
| To insert date using the keyboard, use the Shift+Ctrl+A shortcut. To insert time, use the Shift+Ctrl+I shortcut. |
Insert a Checkbox
To insert a checkbox in the note editor:
-
Click on the location where you want to insert the checkbox.
-
Click the .
-
Click on the checkbox if you want it to be checked. Click again to uncheck it.
| Pressing Enter after a line containing a checkbox will insert another checkbox at the start of the new line. |
4.3. Finding Text
-
Click on the command. The Find And Replace dialog will appear.
-
In the Find what box, enter the text you want to search for.
-
Click Find What.
| To search again for the same text, use the F3 shortcut. |
4.4. Markdown-style Shortcuts
[Since 8.0] MyInfo supports Markdown-style shortcuts in the text editor that allow you to format text as you type.
For example typing **important note** produces important note (makes it bold).
The following commands are available:
Inline Commands
-
Wrap text between * and * or between _ and _ to make it italic.
-
Wrap text between ** and ** or between __ and __ to make it bold.
-
Wrap text between *** and *** or between ___ and ___ to make it bold and italic.
-
Wrap text between ~ and ~ to make it underlined.
-
Wrap text between ~~ and ~~ to make it strike-out.
-
Type @ and start typing note title to insert a link to that note
Block Commands
-
# followed by space and text and pressing Enter creates Heading 1 block.
-
## followed by space and text and pressing Enter creates Heading 2 block.
-
### followed by space and text and pressing Enter creates Heading 3 block.
-
#### followed by space and text and pressing Enter creates Heading 4 block.
-
##### followed by space and text and pressing Enter creates Heading 5 block.
-
###### followed by space and text and pressing Enter creates Heading 6 block.
-
1. followed by space and text and pressing Enter creates numbered list.
-
* followed by space and text and pressing Enter creates bullet list.
-
- followed by space and text and pressing Enter creates bullet list.
| You can disable Markdown-shortcuts in the text editor by turning off the Enable Markdown-style shortcuts option in |
4.5. Replacing Text
-
Click on the command. The Find And Replace dialog will appear.
-
In the Find what box, enter the text you want to search for.
-
In the Replace with box, enter the replacement text.
-
Click Replace to replace the first occurrence of the text or click Replace All to replace all occurrences of the text in the note editor.
4.6. Checking Spelling
By default MyInfo checks your spelling as you type. Misspelled words are marked with a wavy red line under them.
To work with a misspelled word, right click with the mouse on it, so the note editor context menu appears. The following options are available there:
| This option | Does |
|---|---|
A list of suggestions |
Click on any of the suggestions in the list to replace the misspelled word with the suggested word. |
Add to Dictionary |
Adds the misspelled word in the dictionary, so it is no longer shown as misspelled word. |
MyInfo uses all installed dictionaries when spell checking.
4.7. Working with Tables
Insert a Table
To insert a table in the note editor:
-
Click on the location where you want to insert the table.
-
Click on the command. The Insert Table dialog will appear.
-
Specify how many table columns and rows you want in the Number of columns and Number of Rows boxes.
-
If you want the table to automatically fit within the note editor width, select the Auto fit to window option.
-
5. If you want the table to have a fixed width in points, select the Fixed column width and type the desired column in the Fixed column width box.
-
Click OK.
Navigating in Tables
To move in a table using the keyboard:
| To | Press |
|---|---|
Move to the next cell |
Tab |
Move to the preceding cell |
Shift+Tab |
Move to the preceding row |
Up Arrow |
Move to the next row |
Down Arrow |
Start a new paragraph |
Enter |
Selecting Table Items
To select items in the table using the mouse:
| To | Do this |
|---|---|
Select a row |
Click to the left of the row. |
Select a column |
Click the column’s top border. |
Select multiple cells, rows, or columns |
Drag across the cell, row, or column; or select a single cell, row, or column, and then hold down Shift while you click another cell, row, or column. |
Select an entire table |
Click anywhere on the table and then select the command. |
Resize Table and Cells
To resize a column:
-
Drag the right column border to resize it.
To resize a row:
-
Drag the bottom row border to resize it.
Add a Column
To insert one or more columns in a table:
-
Select the column to the right of where you want to insert new columns. Select the same number of columns as the number of columns you want to insert.
-
You can insert the column:
-
to the right, by clicking on the command.
-
to left of the selection, by clicking on the command instead.
-
Add a Row
To insert one or more rows in a table:
-
Select the row below where you want to insert new rows. Select the same number of rows as the number of rows you want to insert.
-
You can insert the row:
-
below the selection, by clicking on the command.
-
above the selection, by clicking on the command instead.
-
| Pressing Tab in the last table cell creates a new table row. |
Delete a Column
To delete columns from a table:
-
Select the columns you want to delete.
-
Click the command.
Delete a Table
To delete a table from the note editor:
-
Select the table you want to delete.
-
Click the command.
4.8. Text Styles
You can use a rich set of tools to format text in the note editor. You can select different fonts, sizes, and effects like bold, italic, and underline. Applying them directly however may not be the best way to use them, because it makes them harder to modify later.
Use text styles instead. Text styles are set of predefined text formattings like headings, emphasized text, and code blocks. When you use styles to format your notes, you can quickly and easily apply a set of formatting choices consistently throughout all notes in the whole notebook.
Changing formatting of a style will change the appearance of all text that uses this style in the notebook. This makes it easier to experiment with different formattings.
4.9. Zooming Note Editor
You can change the size of the text and items in the note editor, by zooming the editor.
You can either use the ![]() command to make the text bigger or the
command to make the text bigger or the ![]() command to make the text smaller.
command to make the text smaller.
| You can zoom in/out using the mouse by holding down the Ctrl key and scroll the mouse wheel while the mouse cursor is over the note editor. |
5. Searching for Information
MyInfo offers a wide array of features for finding and filtering your information.
5.1. Search
You can search for notes by typing one or more phrases and optionally connect them with keywords.
Phrases
Any text that is not a keyword (NEAR, NOT, AND, OR) or is enclosed in quotes is a search phrase (examples: car, "my car").
By default MyInfo searches only for notes containing the exact phrases. If you want to search for notes containing any text starting with the phrase add the * symbol after it (examples: car*, "my car"*).
Boolean operators
You can connect queries with boolean operators. They are ordered by their precedence (from the strongest to the weakest below):
-
NOT <phrase>or-<phrase>Matches if phrase is not present in the note. -
<phrase1> AND <phrase2>Matches if both phrase1 and phrase2 match. By default all phrases are implicitly connected with theANDoperator, so you do not need to type it in your searches. -
<phrase1> OR <phrase2>Matches if either phrase1 or phrase2 match.
NEAR groups
Typing NEAR between two or more phrases matches notes containing those phrases within 10 words of each other (for example: my NEAR car).
Special attributes
You can search in specific note attributes by prepending your search phrase with its name.
The following special attributes are supported:
| Search by | Operators & example |
|---|---|
Specific note attribute |
|
Hierarchical tags [Since 8.0] |
|
Specific note date attribute [Since 7.1] |
|
Notes that have values in certain attributes |
|
Notes with clones |
|
Notes with forms [Since 8.0] |
|
Locked notes |
|
Notes that contain links |
|
Notes that have todos |
|
Any note attribute value |
|
Values in built-in attributes |
|
Values in attributes created by you |
|
Note text content |
|
Attachment content |
|
Both note text and attachments content |
|
Notes that have attachments |
|
Attachments with a certain file name |
|
Attachments with a certain file type |
|
Attachment file name and type |
|
Attachment file name, type and content |
|
Notes that contain images |
|
Search query examples
meeting
Finds all notes containing the phrase meeting. All searches are case-insensitive, so this will also search for Meeting, MEETING and so on.
meeting -2008
Finds all notes containing the phrase meeting and not containing the phrase 2008.
"new year"
Finds all notes that have the phrase new year in it.
car*
Finds all notes that have phrases beginning with car like car, cars, cartoon and so on.
"john smith" tag:@phone
Finds all notes that have the phrase john smith and have that tag @phone.
car OR auto
Finds all notes that have at least one of the phrases car or auto.
one NEAR two NEAR three
Finds all notes that have the phrases one, two and three within 10 words of each another.
updated:day-1
Finds all notes that were updated since yesterday.
due:2020-05-05 -due:2020-06-05
Finds all notes that have a due date on or after May 5, 2020 and before June 5, 2020.
created:20000620
Finds all notes that were created since June 20, 2020.
Search in Dates [Since 7.1]
You can search for notes in specific date ranges. All system date attributes are supported (see Special attributes above for details).
All searches find notes on and after a specific date. So, if you use updated:day-7 for example, this will find all notes that were updated 7 days ago or more recently. You can find all notes before a specific date by prepending the search term with a - (-updated:2020 will find all notes updated before January 1, 2020).
You can search by relative dates using the [day/week/year]+/-[number]:
updated:day-3, created:week-2 due:year+1
Or you can search by a full or partial date using YYYYMMDD or YYYY-MM-DD syntax where YYYY is a four-digit year, MM is a two-digit month and DD is a two-digit date. Month and day parts are optional:
updated:20001001, started:2002-10-03, due:200512, completed:2022
Finally, you can search for notes without specific date attribute by typing: [date attribute]:none:
due:none, started:none
Search in Attachments
MyInfo indexes attachments content too, so it searches in the attachments with the following file formats:
-
Adobe Acrobat PDF files (pdf)
-
Comma-, pipe- and tab- separated Value files (csv, hl7, psv, tsv)
-
Email messages (eml)
-
Hypertext Markup Language files (htm, html, shtm, shtml, xhtm, xhtml)
-
MS Excel spreadsheets (xls, xlsx)
-
MS Power Point (versions 2007-2016) slides (pptx)
-
MS Word documents (doc, docx)
-
Plain text files (log, txt)
-
Web archive files (mht, mhtml)
6. Printing Notes
6.1. Customizing Printing Header & Footer
To change the printing header and footer:
-
Select command.
-
The Page Setup dialog will appear.
-
Change the header and footer, by typing the text you want to appear on each printed page, in the six boxes in the Print header and footer section.
-
Click OK to accept the changes.
The following special codes are supported:
| To display | Add this text |
|---|---|
Notebook file name, including file path |
&f |
Notebook file name only |
&n |
Notebook title |
&o |
Current date |
&d |
Current time |
&t |
Current page |
&p |
Total number of pages that will be printed |
&P |
| These commands are case-sensitive. |
Example: if you are printing a notebook, containing 4 pages text and add the following left header: "&p of &P", the first printed page left header will be "1 of 4", the second "2 of 4", etc.
7. Customizing MyInfo
MyInfo offers many ways to customize its user interface and functionality to fit into your workflow.
7.1. Menus & Toolbars
Showing/Hiding Toolbars
-
Click on the menu item and in the list click on the toolbar that you want to make visible.
-
Click on the menu item and in the list click on the toolbar that you want to hide.
| To toggle toolbar visibility more quickly, right click on the menus/toolbars area of the application window and click on the toolbar name in the list. Toolbars that are currently visible have a ✓ symbol in front of their name. |
Modifying Menus & Toolbars
You can customize menu and toolbar commands by adding, removing or moving them around.
To add a command to the menu or to a toolbar:
-
Click . The Customize dialog will appear.
-
Click on the Commands tab.
-
Click on the Category where the command you want to add is located.
-
Drag and drop the menu item or the button to its new location.
-
Click the Close button to close the Customize dialog.
To remove a command from the menu or from a toolbar:
-
Select the command. The Customize dialog will appear.
-
Drag the command you want to remove off the menu (so that the mouse pointer changes to a X).
-
Click the Close button to close the Customize dialog.
To move a command from the menu or from a toolbar to a new location:
-
Click . The Customize dialog will appear.
-
Drag the command button to the new location on the same menu/toolbar or to another menu/toolbar.
-
Click the Close button to close the Customize dialog.
To copy a command from the menu or from a toolbar to a new location:
-
Click . The Customize dialog will appear.
-
Hold down the Ctrl key and drag the command button to the new location on the same menu/toolbar or to another menu/toolbar.
-
Click the Close button to close the Customize dialog.
Creating or Deleting Custom Toolbars
To create a new custom toolbar:
-
Click . The Customize dialog will appear.
-
Click the New button. The Add Toolbar dialog will appear.
-
Type the name of the toolbar you want to create and click OK.
-
A new toolbar will be created under the existing toolbars.
-
Drag the toolbar to a different place if you want to.
-
Add new commands to the toolbar.
-
Click the Close button to close the Customize dialog.
To delete an existing custom toolbar:
-
Click . The Customize dialog will appear.
-
Select the toolbar you want to delete and click the Delete button. Confirmation dialog will appear.
-
Click OK to confirm that you want to delete the toolbar.
-
Click the Close button to close the Customize dialog.
Restoring the Menu or a Toolbar
To restore the original commands and settings of the menu or of a toolbar:
-
Click . The Customize dialog will appear.
-
Select the toolbar you want to restore and click Reset.
-
The Reset confirmation dialog will appear. Click OK to confirm that you want to reset the toolbar.
-
Click the Close button to close the Customize dialog.
Change Menu or Toolbar Settings
To change the menu and toolbars options:
-
Click . The Customize dialog will appear.
-
Click on the Options tab.
-
The following options are available:
| This option | When turned on, does |
|---|---|
Menus show recently used commands first |
MyInfo will show only the commands you use most frequently in the main menu. |
Show full menus after a short delay |
MyInfo will show only the commands you use most frequently in the main menu, but after a short delay it will show all commands, if you have not clicked on a menu item already. |
Large icons |
Increases the size of toolbar buttons so that they are easier to see. |
Show ToolTips on toolbars |
Displays on-screen descriptions of toolbar buttons when the pointer pauses on them. |
Show shortcut keys in ToolTips |
Displays keyboard shortcuts in tooltips. |
Menu animations |
Changes the way menus display when you click on a command. For example, Slide Menu Animation causes the menus to display with a sliding motion. |
-
Turn the options you want on or off.
-
Click the Close button to close the Customize dialog.
7.2. Keyboard Shortcuts
Most MyInfo commands can be executed by pressing a key combination. Whenever possible, these combinations follow general Windows conventions for shortcuts like Ctrl+C for Copy, Ctrl+V for Paste, etc.. However, you can have your own preference for these shortcuts or you may want to create a shortcut for a command that does not have one. You can do that in the Keyboard Shortcuts dialog.
To see a list of all assigned keyboard shortcuts click to open the dialog with the same name.
Assigning Keyboard Shortcuts
-
Open the Keyboard Shortcuts dialog by clicking .
-
Find the command that you want to modify in the Commands list and click on it.
-
Click in the shortcut edit box on the bottom of the dialog and press the key combination that you want to use for the command.
-
If the shortcut is already used by another command, you will be warned.
-
When you are ready with the new combination, press Assign.
| You can reset all commands to their defaults using the Reset All command. |
7.3. Plugins
MyInfo supports third-party import and export plugins in order to allow it work with a wide array of other software applications. By default, it ships with a predefined set of essential import and export plugins, but you can add more by downloading them from our website.
You can see the full list and information about installed of plugins in the Add-ons dialog by clicking .
Installing Plugins
-
Download a plugin from our web site to a location on your computer.
-
Open the Plugins dialog by clicking .
-
Click Install.
-
In the Browse dialog, locate the downloaded plugin file (.dll or .zip), select it and click Open.
-
Close the Add-ons dialog.
-
The newly installed plugin should be now available in the dialogs, depending on its type.
Updating Plugins
-
Download the newer version of the plugin from our website to a location on your computer.
-
Follow the same steps from To install a new plugin with the newly downloaded version of the plugin. This will replace the old version with the new one.
Uninstalling Plugins
-
Open the Plugins dialog by clicking .
-
Select the plugin you want to uninstall by clicking on it in the list with the plugin names.
-
Click on the Uninstall button in the low right corner of the plugin information section of the dialog.
-
Click Uninstall in the confirmation dialog.
7.4. Spelling Dictionaries
MyInfo has an English spelling dictionary installed by default. But you can install many more dictionaries, if you need to check your spelling in a different language. Currently 40+ languages are available in MyInfo.
To see the currently installed spelling dictionaries click .
Installing Dictionaries
To install a new dictionary:
-
Open the Dictionaries tab in the Add-ons dialog by clicking .
-
Click on the Add additional spelling dictionaries list on the bottom of the dialog and select the language that you want to add.
-
Click Add. The dictionary will appear in the list above and from now on will be used when checking the spelling in the note editor.
Uninstalling Dictionaries
To remove an existing dictionary:
-
Open the Dictionaries tab in the Add-ons dialog by clicking .
-
Select the dictionary you want to remove in the list.
-
Click Remove. The dictionary will disappear from the list of installed dictionaries and will no longer be used for checking the spelling in the note editor.
8. What’s New
8.1. New Features
MyInfo 8
MyInfo 8 builds on top of the already solid MyInfo 7 with the following new features and improvements:
-
Dark mode
-
Note Structure pane - browse note headings and navigate long documents
-
Code snippets - insert code examples with beautiful syntax highlighting
-
Optimize Note Width - optimizes note content width for readability on wide monitors
-
Go To Anything command - more powerful version of the Go To Note command that searches not only for notes, but also for notebooks, sections, perspectives, and tags
MyInfo 7
MyInfo 7 introduces numerous new features and improvements, including:
-
Cross-platform, database-backed file format, which makes loading and saving your notebooks instantaneous
-
Updated user interface and high-DPI monitors support
-
Undo/redo anything using notebook revisions
-
Multiple sections per notebook
-
Perspectives
-
Conditional formatting rules for the items in the note list
-
Fully editable note templates (title, text, attribute values), stored in the notebook
-
New attribute types (duration, email, rating, url), and more attribute options (setting default attribute values for new notes)
-
Text styles can inherit another style formatting, text style keyboard shortcuts
-
Multiple attachments per note
-
Larger attachments (note + attachments content can now be up to 100 MB for the Professional edition)
-
Attachment indexing (MS Word, MS Excel, MS PowerPoint, Acrobat PDF, email messages, web pages, and text files are indexed and included when searching for notes)
-
Quickly filter notes in the note list
-
Filtering by multiple tags
-
Titles of links to other notes are automatically updated if the target note is renamed
-
Linking and previewing external files
-
Any linked file content can be stored inside the notebook (in previous versions only web pages could be stored)
-
More search operators (has:) and the ability to perform negative-only searches
-
More note icons and improved icon selection dialog with search
-
Improved note templates (now saved in the file)
-
Note background colors
-
Multiple backups per notebook and backup interval option
-
Notebook Trash from where you can restore deleted sections and notes
-
Notes can contain todo lists
-
Improved Tags pane where it is now possible to create tags even if they are not assigned to notes
-
Lock Note command
-
Unlimited number of forms
-
Note editor Zoom
8.2. File Format
MyInfo 7 uses a new, database-backed file format. This brings some great benefits like:
-
Loading and saving of existing files is lightning fast. In fact, we have removed the Save command, because every change is saved automatically as it occurs.
-
Files are more robust. System crashes or power failures can’t corrupt them, because changes to the files either happen fully, or don’t happen at all.
-
Cross-platform compatibility: the new file format will allow us to share the same files between MyInfo applications for different PC/mobile platforms.
-
Single file can contain multiple sections (previously topics).
8.3. Changed Terminology
We’ve changed some of the terminology used in MyInfo to make it more clear and consistent, by aligning it with the terminology used in other note-taking products such as OneNote and Evernote.
-
Documents are now notes.
-
Topics are now sections.
-
Workspaces are notebooks. Each notebook can contain one or more sections, but everything is stored in a single file.
-
Filters and some appearance options are now combined in perspectives.
8.4. Commands
Some new commands were added since MyInfo 6 and some command names have been changed:
New Commands
| Menu/Command | Does |
|---|---|
Imports MyInfo 6.x or earlier file as new section in the active notebook |
|
Imports MyInfo 6.x or earlier file as a new notebook |
|
Copies link to the selected section |
|
Protects the note from accidental changes (makes it read-only) |
|
Allows you to change the visible attributes for the active section |
|
Change the currently active perspective |
|
Create new, manage or delete existing perspectives |
|
Reloads the notebook, so you can see any changes made to the note list or options, made by another user, if multiple people are working on the same notebook |
|
Opens the Templates section where you can create, edit and delete note templates |
|
Opens notebook trash from where you can restore deleted notes |
|
Inserts attachment in the active note |
|
Inserts checklist item |
|
Create new, manage or delete existing note list conditional formatting rules |
|
Optimizes notebook to use minimal space on your computer. This is also done automatically in an interval specified in the application Options |
Renamed/Moved/Removed Commands
Commands that contained the old MyInfo terminology (topic and document) are renamed with the new terms (notebook and note). Other menu changes are:
| Menu/Command | Does |
|---|---|
|
Removed. MyInfo now saves your changes automatically. |
Removed. |
|
|
Removed. |
Renamed to Attributes Pane. |
|
Moved as submenus to Insert Note and Insert Subnote. |
|
Removed. |
|
Removed. MyInfo does not support OLE objects anymore. |
|
Renamed to Text From File. |
|
Renamed to Check Spelling as You Type. |
|
Renamed to Sort Siblings Once. |
|
Renamed to Forms. |
|
Renamed to Reindex Notebook. Hidden by default. |
|
|
Removed. |
8.5. Breaking Changes
MyInfo 7.3
-
MyInfo now stores its configuration data in settings.json (was using options.ini before). Generally, it will automatically pick up the old configuration. However, in some cases, it might not (if you install MyInfo 7.3 Portable, start it, and then copy the old options.ini). In that case, exit the app, delete settings.json, and start again. Now it should import the options.ini content properly.
MyInfo 7.0
-
dropped Windows XP and Windows Vista support
-
Due to the new cross-platform file format, OLE objects are no longer supported in MyInfo. They are Windows-specific feature and can’t be viewed or edited on other platforms, so they are no longer available.
-
removed Block Pop-ups option from the Browser options section. Popups are blocked always now
-
cutting notes now only marks them for cutting and they are moved when Paste is executed like in Windows Explorer
-
removed Go To Note with Index from status bar
-
changed note selection algorithm: in the old versions the focused note was the active note for all commands. Now it is the selected note. Focused note now is used only to select/deselect notes with the keyboard in the note list
-
changed Show State Images menu shortcut to Ctrl+Alt+Space, so you can selected notes using Ctrl+Space
-
changed global shortcut for activating MyInfo to Win+Ctrl+I due to conflict with an existing shortcut in Windows 10. The old one (Win+Ctrl+M) still works in the previous versions of Windows
-
removed custom states support, because of portability reasons
-
removed note editor ruler
-
TAB key no longer moves the focus to the note editor when the last note list column is reached. The old behavior can be turned on via Compatibility sub-section of the Advanced section in the Options dialog
-
new sections are created with the None section color, which appearance depends on the current app skin
-
search toolbar is hidden by default. There is a Find Notes button which shows the Search pane instead
-
temporary removed Calendar view. Will be converted to perspective type
9. Reference
9.1. All Commands
This is a list with the names, default shortcuts, and descriptions of all commands that are available in MyInfo menus and toolbars.
| Commands in the Hidden commands section of the tables are not visible by default, but can be added to a menu or to a toolbar via the command. |
File Menu
The File menu contains everything that handles creating files on your computer, including creating new, and opening existing notebooks, backing up, importing and exporting. It also deals with printing and notebook-specific settings.
| Command | What is Does |
|---|---|
New Notebook… | Ctrl+T |
Shows the New Notebook dialog where you can create a new notebook. |
Open… | Ctrl+O |
Opens one or more existing notebooks. Open submenu contains a list of recently used notebooks. |
Open Backup… |
Opens existing notebook backup. |
Close | Ctrl+F4 |
Closes the active notebook. |
Close All |
Closes all open notebooks. |
Import… |
Shows the Import dialog from where you can import sections and notes in MyInfo from a number of file formats. |
Export… |
Shows the Export dialog from where you can export your notes to a number of file formats. |
Page Setup… |
Shows the Page Setup dialog where you can change the default page layout for printing. |
Print Preview |
Shows the Print Preview window where you can see how your notes will look like when printed. |
Print… | Ctrl+P |
Shows the Print dialog where you can print your notes. |
Notebook Properties… |
Shows the Notebook Properties dialog with useful information about the active notebook. |
Notebook Password… |
Shows the Notebook Password dialog where you can password-protect your notebook. |
Exit |
Completely exits the application. |
Hidden File commands:
| Command | What is Does |
|---|---|
Rename |
Allows you to rename the active notebook. |
Save Note As |
Saves active note editor contents as file. |
Print Note |
Prints active note editor contents. |
Edit Menu
The Edit menu contains commands related to editing. Many of the standard functions you’ll find in most Edit menus can be found here, including cut, copy, paste and delete, along with a large number of commands related to editing notes.
| Command | What is Does |
|---|---|
Undo | Ctrl+Z |
If the note list is active, undoes the last notebook revision. If a text editor is active, undoes the last change made there. |
Redo | Ctrl+Y |
If the note list is active, redoes a single undone notebook revision. If a text editor is active, redoes the last undone change made there. |
Cut | Ctrl+X |
If the note list is active, marks selected notes for moving. If a text editor is active, cuts the selected text to the Windows Clipboard. |
Copy | Ctrl+C |
Copies selected notes or text to the Windows Clipboard. |
Copy Link: |
|
Copy Link to This Paragraph |
Creates a bookmark in the note editor and copies a link to this note and this paragraph to the Windows Clipboard. |
Copy Link to This Note |
Places a link to the active note in the Windows Clipboard. |
Copy Link to This Section |
Places a link to the active section in the Windows Clipboard. |
Copy Link to This Notebook |
Places a link to the active notebook in the Windows Clipboard. |
Paste | Ctrl+V |
If the note list is active, pastes Windows Clipboard content as new notes. If a text editor is active, pastes text from the Windows Clipboard. |
Paste Advanced: |
|
Paste Special |
Shows the Paste Special dialog where you paste a specific text or picture format of the Clipboard content in the note editor. |
Paste Text |
Pastes the Windows Clipboard text in the text editor using the current formatting. |
Paste Clone | Shift+Alt+V |
Pastes note as a clone. |
Auto Paste |
Toggles the Auto Paste mode. |
Delete | Del |
If the note list is active, deletes selected notes. If a text editor is active, deletes selected text. |
Select All | Ctrl+A |
If the note list is active, selects all sibling notes. If a text editor is active, selects all text. |
Rename\Change Value: | F2 |
Activates the attribute value editor for the selected note and column. |
To Selected Text |
Renames active note with the selection of the note editor. |
To Clipboard |
Renames active note with the text in the Clipboard. |
To Date and Time |
Renames active note with the current date and time. |
To Date |
Renames active note with the current date. |
To Time |
Renames active note with the current time. |
Lock Note |
Locks selected note against accidental changes. |
Move: |
|
Up |
Moves selected notes before the previous one. |
Down |
Moves selected notes after the next one. |
Left |
Moves selected notes one level up. |
Right |
Makes selected notes children of the previous sibling note. |
Hidden Edit commands:
| Command | What is Does |
|---|---|
Pastes the text from the Clipboard without formatting and using the Normal text style. |
|
Add Value |
Shows the Add Value dialog where you can add an attribute value to the selected note. |
Move or Copy Notes |
Shows the Move or Copy Notes dialog where you can move or copy selected notes to another section in the notebook. |
View Menu
The View menu contains commands related to changing the way notes are viewed, allowing you to show and hide various elements, navigate between perspectives and customize the way information in the current notebook is displayed. A rule of thumb is, if you want to change the way something in your notebook looks or acts, and it’s not a setting in the main options, chances are it is in the View menu.
| Command | What is Does |
|---|---|
Columns |
Shows the Columns dialog, where you can choose which attributes are visible for the current perspective in the active notebook section, reorder and resize them. |
Attributes |
Shows the Attributes dialog where you can manage the attributes for the active notebook. |
Active Perspective |
Shows a list with available perspectives for the active notebook section. Click on a perspective to switch to it. |
Perspectives |
Shows the Perspectives dialog where you can manage perspectives for the active notebook section. |
Refresh Notebook |
Reloads the notebook, so that if anybody else has made changes to the notebook they will be visible for you. |
Toolbars |
Shows a list with available toolbars. Click on a toolbar to show/hide it. |
Panes: |
|
Notebooks Pane |
Toggles the visibility of the notebooks pane, which contains a list of open notebooks. |
Backlinks Pane [Since 7.2] |
Toggles the visibility of the backlinks pane, where you can see a list of all notes that link to the current note and quickly navigate between them. |
Note Structure Pane [Since 8.0] |
Toggles the visibility of the note structure pane, where you can see a list of all note text headings and quickly navigate between them. |
Tags Pane |
Toggles the visibility of the tags pane, where you can manage active notebook tags. |
Attributes Pane |
Toggles the visibility of the attributes pane, which shows the attribute values for the selected notes. |
Revisions Pane |
Toggles the visibility of the revisions pane, which contains a list of the available notebook revisions. |
Global Search Pane |
Toggles the visibility of the global search pane, where you can search for notes in all your notebooks. |
Status Bar |
Toggles the visibility of the status bar. |
Templates |
Shows the Templates notebook section, where you can manage note templates for the active notebook. |
Trash |
Shows the Trash notebook section, where you can restore deleted notes and sections. |
Reminder Window |
Shows the Reminder window, where you can see pending reminders for all open notebooks. |
Dark Mode [Since 8.0]: |
|
Use System Setting |
Turns on light or dark mode, depending on the OS dark mode setting. |
Light Mode |
Turns on application light mode. |
Dark Mode |
Turns on application dark mode. |
Optimize Note Readability [Since 8.0] |
Toggles whether note text content width is optimized for maximum readability. |
Keep MyInfo On Top |
Toggles whether MyInfo should always stay on the top of all other Windows application windows. |
Expand Subnotes | Shift+Ctrl+= |
Expands all subnotes of the active note. |
Expand All |
Expands all notes in the current section. |
Collapse Subnotes | Shift+Ctrl+- |
Collapses all subnotes of the active note. |
Collapse All |
Collapses all notes in the current section. |
Hidden View commands:
| Command | What is Does |
|---|---|
Text Editor |
Activates the note editor. |
Horizontal Panes |
Toggles the horizontal note list option for the active section. |
Multiline Note Titles |
Toggles the multi-line note list headings option for the active section. |
Expand |
Expands the immediate children of the active note. |
Collapse |
Collapses the immediate children of the active note. |
Go to First Note |
Activates the first note in the note list. |
Go to Last Note |
Activates the last note in the note list. |
Go Up |
Activates the previous sibling note of the active note. |
Go Down |
Activates the next sibling note of the active note. |
Go Left |
Activates the parent note of the active note. |
Go Right |
Activates the first child note of the active note. |
Go to First Sibling Note |
Activates the first note with the same parent as the active note. |
Go to Last Sibling Note |
Activates the last note with the same parent as the active note. |
Back |
Activates the last visited note. |
Next |
Activates the next visited note in the history of visited notes. |
Section Color |
Shows a list with possible section colors. Click on a color to change the color of the active section. |
Background Color |
Shows a list with possible note background colors. Click on a color to change the background color for the note editor of the active section. |
Zoom In |
Zooms in the note editor. |
Zoom Out |
Zooms out the note editor. |
Reset Zoom |
Resets the zoom of the note editor. |
Favorites Menu
The Favorites menu contains all saved favorites and commands for adding and organizing them.
| Command | What is Does |
|---|---|
Add Note |
Adds the active note to the favorites. |
Add Current Section |
Adds the active section to the favorites. |
Add Current Notebook |
Adds the active notebook to the favorites. |
Organize… |
Shows the Organize Favorites dialog where you can manage your favorites. |
Insert Menu
The Insert menu contains commands related to adding new notes to the note list and inserting any type of content to the note editor like text, pictures and links.
| Command | What is Does |
|---|---|
Note | Ctrl+N / Enter |
Inserts a new note in the note list. The submenu shows a list with available note templates for the active notebook. Click on a template to insert a new note based on this template. |
Subnote | Shift+Alt+N / Ctrl+Enter |
Inserts a new subnote in the note list. The submenu shows a list with available note templates for the active notebook. Click on a template to insert a new subnote based on this template. |
Notes From Files… |
Imports existing files as notes in the note list. When possible, MyInfo will insert the file text in the note note editor. If this is not possible, MyInfo will attach the whole file to the note. |
Attachment… |
Inserts an existing file as an attachment to the active note. |
Comment |
Activates the comment attribute value editor for the active note. |
Reminder |
Adds reminder attribute value for the active note. |
Code Snippet [Since 8.0] |
Inserts code snippet with syntax highlighting in the note editor. |
Checkbox |
Inserts clickable checkbox in the note editor. |
Horizontal Line |
Inserts horizontal divider line in the note editor. |
Page Break |
Inserts page break in the note editor. |
Date and Time… |
If the note list is active, inserts a new note using the specified date/time format as its title. If the text editor is active, inserts the current date/time as text. |
Picture |
Inserts an existing picture from your computer in the note editor. |
Text From File… |
Imports the text of an existing file to the note editor. |
Link… | Ctrl+K |
Shows the Link dialog, where you can insert a link to a web page, file or email address in the note editor. |
Hidden Insert commands:
| Command | What is Does |
|---|---|
Date |
If the note list is active, inserts a new note using the current date as its title. If the note editor is active, inserts the current date as text. |
Time |
If the note list is active, inserts a new note using the current time as its title. If the note editor is active, inserts the current time as text. |
Format Menu
The Format menu contains the commands related to formatting individual note headings in the note list and the text in the note editor. You can also manage notebook’s text styles and conditional formatting rules here.
| Command | What is Does |
|---|---|
Font… |Ctrl+D |
Shows the Font dialog, where you can change the text formatting of the selected notes, if the note list is active or of the selected text, if the note editor is active. |
Paragraph… |
Shows the Paragraph dialog, where you can change the paragraph formatting of the selected text in the note editor. |
Styles… |
Shows the Styles dialog, where you can manage the text styles of the active notebook. |
Conditional Formatting… |
Shows the Conditional Formatting dialog where you can manage the conditional formatting rules for the active section and notebook. |
Bulleted List |
Adds or removes bullets from the selected text in the note editor. |
Numbered List |
Adds or removes numbering from the selected text in the note editor. |
Remove Formatting | Ctrl+0 |
Removes all formatting from the selected text in the note editor. |
Hidden Format commands:
| Command | What is Does |
|---|---|
Bold |
Toggles the bold text formatting of the selected notes in the note list or of the selected text in the note editor. |
Italic |
Toggles the italic text formatting of the selected notes in the note list or of the selected text in the note editor. |
Underline |
Toggles the underline text formatting of the selected notes in the note list or of the selected text in the note editor. |
Superscript |
Toggles the superscript text formatting of the selected text in the note editor. |
Subscript |
Toggles the subscript text formatting of the selected text in the note editor. |
Strikethrough |
Toggles the strikethrough text formatting of the selected notes in the note list or of the selected text in the note editor. |
Align Left |
Aligns the selected text in the note editor to the left. |
Align Center |
Aligns the selected text in the note editor to the center. |
Align Right |
Aligns the selected text in the note editor to the right. |
Align Justify |
Aligns the selected text in the note editor to both the left and right margins. |
Increase Indent |
Increases the indentation of the selected text in the note editor. |
Decrease Indent |
Decreases the indentation of the selected text in the note editor. |
Reset Picture Size |
Resets the dimensions of a resized picture in the note editor. |
Save Picture As |
Saves the selected picture in the note editor to a file. |
Tools Menu
The Tools menu contains various commands related to working with the notebook and to finding information in MyInfo. You will find most application options and customizations here.
| Command | What is Does |
|---|---|
Global Search | Shift+Ctrl+F |
Activates the search toolbar, if it is visible, or shows the Global Search pane otherwise. Both allow you to search for notes in your notebooks. |
Recent Edits [Since 7.1]: |
|
Today |
Finds all notes edited today. |
Since Yesterday |
Finds all notes edited today or yesterday. |
Last 7/14/30 |
Finds all notes edited in the last 7/14/30 days. |
Last 3/6 |
Finds all notes edited in the last 3/6 months. |
Go to Anything… [Since 8.0] | Ctrl+G |
Shows the Go to Anything dialog, where you can quickly find and activate a note or perspective from the active section, section or tag from the active notebook, or activate notebook that is open in the app. |
Find Text… | Ctrl+F |
Shows the Find and Replace dialog where you can search for a text in the note editor. |
Replace Text… | Ctrl+H |
Shows the Find and Replace dialog where you can replace text in the note editor. |
Word Count… |
Shows the Word Count dialog where you can see statistics about the text in the note editor. |
Check Spelling as You Type |
Toggles the real-time spelling checker in the note editor. |
Sort Siblings Once |
Sorts alphabetically all notes with the same parent as the active one. |
Hoist |
Toggles the hoisting of the selected note. |
Forms… |
Shows the Forms dialog, where you can manage the forms of the notebook. |
Compact Notebook |
Tries to optimize how the active notebook is stored on your computer thus saving some space. |
Add-ons |
Shows the Add-ons dialog where you can manage installed plugins and spelling dictionaries. |
Keyboard Shortcuts |
Shows the Keyboard Shortcuts dialog where you can customize keyboard shortcuts for the application commands. |
Customize |
Shows the Customize dialog where you can customize application menus and toolbars. |
Options |
Shows the Options dialog where you can change application settings. |
Hidden Tools commands:
| Command | What is Does |
|---|---|
Find Next | F3 |
Searches for the next occurrence of the text specified in the Find And Replace dialog. |
Find Previous | Shift+F3 |
Searches for the previous occurrence of the text specified in the Find And Replace dialog. |
Find in Default Perspective |
If you are in a perspective different than the default and use this command, it will locate and activate the currently selected note in the default perspective. |
Reindex Notebook |
Recreates the search index for the active notebook. |
Table Menu
The Table menu deals with inserting, formatting and editing tables in the note editor.
| Command | What is Does |
|---|---|
Insert Table |
Shows the Insert Table dialog where you can insert a new table in the note editor. |
Insert Columns |
Inserts columns after the currently selected columns in the note editor. The number of inserted columns is equal to the number of the currently selected columns. |
Insert Columns to the Left |
Inserts columns before the currently selected columns in the note editor. The number of inserted columns is equal to the number of the currently selected columns. |
Insert Rows |
Inserts rows below the currently selected rows in the note editor. The number of inserted rows is equal to the number of the currently selected rows. |
Insert Rows Above |
Inserts rows above the currently selected rows in the note editor. The number of inserted rows is equal to the number of the currently selected rows. |
Select Column |
Select the whole column where the active table selected cell is located. |
Select Row |
Select the whole row where the active table selected cell is located. |
Select Table |
Select the whole table that is active in the note editor. |
Delete Columns |
Deletes selected table columns from the note editor. |
Delete Rows |
Deletes selected table rows from the note editor. |
Delete Table |
Deletes the active table from the note editor. |
Split Cells |
Splits selected, already merged cells from the active table in the note editor. |
Merge Cells |
Merges active table selected cells in the note editor. |
AutoFit to Window |
Toggles active table width between the whole width of the note editor and a manually set width. |
Table Properties |
Shows the Table Properties dialog where you can format the active table in the note editor. |
Hidden Table commands:
| Command | What is Does |
|---|---|
Align Top |
Aligns selected table cells content vertically to the top. |
Align Middle |
Aligns selected table cells content vertically to the middle. |
Align Bottom |
Aligns selected table cells content vertically to the bottom. |
Window Menu
The Window menu contains commands for navigating the sections in the notebook.
| Command | What is Does |
|---|---|
New Window [Since 7.3] |
Creates new application window. |
[List of windows] [Since 7.3] |
Click on a window in the list to activate it. |
Hidden Window commands:
| Command | What is Does |
|---|---|
Next Section | Ctrl+Tab |
Activates the next section of the notebook. |
Previous Section | Shift+Ctrl+Tab |
Activates the previous section of the notebook. |
Help Menu
The Help menu has useful tools and links for learning MyInfo, as well as a way to check for application updates available on our website, or to give us feedback and bug reports.
| Command | What is Does |
|---|---|
MyInfo Help |
Shows MyInfo help. |
Example Notebooks |
Shows a list with sample notebooks. Click on a notebook in the list to open it. |
Import Legacy Topics |
Shows the MyInfo Topics Import dialog where you can import topics from MyInfo 6 and older versions. |
MyInfo on the Web |
Opens the MyInfo website in your default web browser. |
Install Web Clipper [Since 7.2] |
Opens our Web Clipper webpage, where you can install MyInfo Web Clipper for your browser. It allows you to quickly send parts or whole web pages to MyInfo. |
Check for Updates |
Checks if newer version of MyInfo is available. If there is a new version, it shows an information about what’s new there and offers you the option to download and install it. |
Feedback |
Creates a new email in your default email client, where you can send us feedback about MyInfo. |
About |
Shows version information, copyright notice and credits about other code that MyInfo uses. |
9.2. Global Hotkeys
MyInfo offers some global hotkeys, which are available from any application as long as MyInfo is started:
| To | Press |
|---|---|
Activate MyInfo |
Ctrl+Win+I |
New note |
Ctrl+Win+T |
Toggle AutoPaste |
Ctrl+Win+A |
Paste Clipboard content into MyInfo |
Ctrl+Win+U |
| [Since 8.6] You can edit these hotkeys via . |
9.3. Options
MyInfo uses sensible default options that should be good enough for most use cases. However, it offers a wide array of settings that you can adjust, so that you can tailor MyInfo to your specific needs.
General
- Close button minimizes application to traybar
-
When this option is enabled, closing MyInfo from the title bar will minimize it to the traybar, instead of exiting it. To exit MyInfo use in this case.
- Run on Windows startup
-
When enabled, MyInfo will start automatically when you log-on to Windows.
- User name
-
This is the name that will show up as an author to all changes you make to your notebooks. Other people using the same notebook will see this name for notes that you are currently editing.
Display
This section contains options specifying how different areas of the application look like by default.
Note List Appearance
- Font
-
Select default font name, size, style, and color for the note list items.
- Background
-
Select the note list background color.
- Show tree lines
-
Enable this option to show lines connecting notes and their parents and children.
- Show tree grid
-
Enable this option to show a grid separating note list items and columns.
- Show empty attribute prompts
-
Enable this option to see the attribute names for these fields of the selected note in the tree that have no attribute values assigned.
| You can change the appearance of empty notes using the command. |
Save & Backup
This section contains options related to where and how your information is stored.
File Locations
These locations specify where your notebooks, notebook templates and backup files are stored.
Select location in the list and click Modify to change it.
| Locations | What is Used For |
|---|---|
Notebooks |
This is the default location where your notebooks are stored. When you create a new notebook, it will be stored here. This is also the path where MyInfo will look if you use Global Search with the All Notebooks option selected. |
Templates |
This is the notebook templates location. Notebooks in this folder will show up as templates when creating a new notebook. |
Backup files |
This is the default location where your notebooks backup copies will be stored. Please refer to the notebook backups section for some caveats, though. |
External files |
The default folder which MyInfo will use when you insert external files in the note list or in the note editor. |
Backup
- Automatically backup notebooks at this time interval
-
Enable this option, if you want MyInfo to automatically create backup copies of your notebooks at the specified interval.
- Number of backups to keep
-
The number here determines the maximum number of backup copies that will be kept for each notebook. When MyInfo needs to create more backups than this number, it will delete the oldest of them, so only this number of backups will remain.
- Backup Open Notebooks Now
-
Use this command to create backup copies of all open notebooks, if they do not already have recent backups.
Import
This section contains options related to importing external data in MyInfo.
- Automatically assign stateys
-
When enabled, MyInfo will assign stateys to some notes when importing them. For example if you import a MS Word file, it will be assigned an MS Word statey.
- Preserve imported file extension
-
When enabled, MyInfo will keep the file extension in imported notes from files in their titles.
- Use title instead of file name for imported web pages
-
When enabled, MyInfo will use the web page title attribute as note title, whenever it is available.
- Always embed copy of imported file
-
When enabled, MyInfo will keep an attached copy of files, even if it can import its text in the note editor.
- Smart folder import
-
When enabled, MyInfo will try to combine folders and RTF files with the same name on import, creating a clean tree without duplicate entries. That allows you to export a section as folders and later import it in MyInfo, preserving the tree structure intact.
- Do not import folders ending with "\_files"
-
When enabled, MyInfo will not import folders ending with the "\_files" suffix. It is used by Windows for storing images and styles information for web pages, which MyInfo imports as part of the web pages anyway.
Editing
This section contains options related to the note editor.
- Check spelling as you type
-
When enabled, MyInfo will check the spelling of the text in the note editor as you type there. Click on the Manage Dictionaries button to select dictionaries for which languages to be used.
- Insert relative links when possible
-
When enabled, MyInfo will insert links to external files on your computer using relative paths with the notebook folder as a base. This means that if you move both your notebook and the linked files to another drive, they should continue to work.
- Include link to source when pasting from the Web
-
When enabled, MyInfo will insert a small snippet with the address of the web page from where you’ve pasted. You can select if the option will apply to items pasted in the note list and/or in the note editor.
- Set first indent with tabs and backspaces
-
When enabled, you can use Tab to indent the selected text and Backspace to outdent it. The latter will work only if the caret is at the start of a paragraph.
- Editor tab size
-
Specify how many spaces to insert in the note editor, when you press Tab.
Reminders
- Show reminder dialog
-
When enabled, MyInfo will show a pop-up dialog with information about a note when its reminder is due. If unchecked, it will show information only in the status bar.
- Play reminder sound
-
When enabled, MyInfo will play the specified sound file when a note reminder is due.
Browser
This section contains options related to the internal web browser.
- Automatically open web pages and supported attachment file types
-
When enabled, MyInfo will automatically show the web browser for notes that have default attachments with the file types specified in the edit box below. If the option is disabled, you have to click Open Link manually to see the content of these default attachments.
Send to MyInfo
This section contains options related to sending web snippets to MyInfo using web browser extensions.
- Select where Send to MyInfo should place your snippets
-
This option determines in which notebook MyInfo will store web snippets sent from web browser extensions. You can select either a specific notebook or use the currently active one.
- Play sound when capturing text from other applications
-
When enabled, MyInfo will play a sound when it successfully inserts text sent to it from other application
Quick & Auto Paste
This section contains options related to the Quick and Auto Paste features of MyInfo.
- Select where to paste information when Quick/AutoPaste is used
-
Three options are possible:
-
Select automatically will paste notes if the note list is active and text if the note editor is active.
-
Paste as a new note will always paste notes in the note list.
-
Paste in the note editor will always paste text in the note editor.
-
- Use the following separator when pasting in the note editor
-
type some text that will be inserted between Quick/Auto paste texts in the note editor.
Customize Stateys
This section allows you to customize the stateys context menu. It can show up to 12 predefined stateys.
-
Select the item you want to change.
-
Use one of the following commands:
Command What it Does Change Icon
Shows the Statey dialog where you can choose a new statey for this item. If you want to hide the item, select the first None statey.
Rename
Allows you to type a custom name for the item.
Move Up
Moves the item up in the context menu.
Move Down
Moves the item down in the context menu.
Updates & Privacy
This section contains options related to having MyInfo up-to-date and helping us improving MyInfo.
- Automatically check for new versions of MyInfo
-
When enabled, MyInfo will periodically check if you are running the latest version of MyInfo and if not, it will offer you to update to the latest version.
- Send anonymous usage statistics
-
When enabled, MyInfo will periodically send some anonymous information about how MyInfo is used on your computer (OS, commands, etc).
| This WILL NEVER INCLUDE personal data or sensitive information such as file names or content from your notebooks. |
Advanced
This section contains various rarely used or compatibility options.
- Show recently used notebooks list with X entries
-
When enabled, MyInfo will show the specified number of recently used notebooks in the recently used file list.
- Default perspective type for new sections
-
Determines the note list workflow for new sections. The possible values are:
Value What it Means Always Ask
When you create a new section, you will see a dialog where you can select the workflow for this section.
Tree
Will create new sections with the tree workflow by default.
List
Will create new sections with the list workflow by default.
- Mark search results with this color
-
Determines the color which will be used to highlight matching note text sections when using Global Search.
Compatibility
The following compatibility options are available:
| Option | What it Does |
|---|---|
Disable multi-section notebooks support |
When enabled, MyInfo will show notebooks instead of sections in the tabs above the note tree and the note editor. This mimics how MyInfo worked in version 6 and below. |
Single mouse click opens hyperlinks |
When enabled, single mouse click on a link in the note editor will directly open it. |
Don’t create notes with Enter or Ctrl+Enter |
When enabled, the Enter and Ctrl+Enter shortcuts will not create new notes in the note list. |
Ctrl+Enter closes comment editor |
When enabled, pressing Ctrl+Enter will close the inline comment editor, while Enter will create a new line. |
Enable incremental search in the note list |
When enabled, typing some text in the note list will move you to a matching note title. You can use Ctrl+Up to go the previous matching note, Ctrl+Down to go to the next matching note and ESC to cancel the incremental search. |
Do not show first search result automatically |
When enabled, MyInfo will no longer automatically open the first matching search result in Global Search. |
TAB moves to the note editor when in last note list column |
When enabled, pressing TAB while you are in the last note list column will focus the note editor rather than cycling to the first column. |
Expand immediate children only |
When enabled, MyInfo will show only immediate children of the expanded note. |
Hide quick filter above the note list |
When enabled, MyInfo will no longer show the quick filter editor. |